My Daughters 1st Birthday Cake - Giant Cupcake Rainbow Layer Cake!
I had seen many times before a beautiful lay out of perfectly sculptured cakes and delicate decorations for kid’s birthday parties and I knew that I could only do this once or twice before the children will want something different for their parties as they get older. Quietly in the background we can all hear our husbands mumbling to themselves something along the lines of ‘why is she going to this much trouble?’ or ‘what’s the point they are only 1 they won’t even remember!’ We all know the reason why we do this and for me organizing celebrations, making, designing and creating makes me happy.
I've always wanted to do a Giant Cupcake and I had researched the technique to make sure I had all the equipment and the design down pat. I came across a very informative and visual tutorial on making the base out of white chocolate and the center in rainbow layers (links for these tutorials will be at the bottom of the blog). I was not sure how to complete the top of the cake but when I did, it turned out amazing.
So to start with I tested the white chocolate base in my Wiltshire Giant Cupcake Tin using the bottom half of the tin only.

I melted the chocolate according to the packet instructions. I used Cadbury White Chocolate Melts, oh my they were so yummy. All the instructions for this tutorial will also be at the bottom of this post. Also there is no need to prepare the tin before putting the chocolate in, just make sure it’s clean and dry. First I put in about 300g (approx. it may have been more as I was using a different tin to the one in the tutorial) and moved the tin around to get the chocolate up to the top of the tin and continued to turn it around until the entire section was covered in chocolate. This will be the first layer of about 3-4 depending on the chocolate you use. Then popped it into the freezer for about 10-15 min. Once it has cooled and hard, add your next layer using a plastic basting brush. Never mind about the brush marks this will create because your first layer will be very smooth. Put this back into the freezer to harden. Do this once or twice more or until you think your layers are thick enough. Now in the tutorial they put it in the fridge 20 min each time, but because I wanted to get it done quickly while my son was watching the TV during lunch, I only had a little time to do the test.
I don't have any photos of the final version, but here is the pic of the test one I did.

I had to leave the plastic over it while I was taking the photo, because a certain little boy could not keep his hands to himself while I was taking the photo...
So, surprisingly it just popped out of the tin very easily. I didn't even have to put room temperature water over the back of the tin first. I placed my hand inside close to the bottom and applied gentle pressure in an outwards motion and it just popped out! I really thought I was a professional then because my first test came out beautifully. Don't you just love it when that happens?
Next step is to bake the coloured layers. I heard using the very popular Wiltons Icing Colours for the rainbow layers were great because of how vivid the colours looked after baking. And true to form, they really did look amazing.

I used the cake mix according to the instructions on the tutorial, and it really did taste lovely. Oh and by the way…. What a mess! There was coloured mixture everywhere. Anyway, I had 6 rainbow layers, red, yellow, pink, green, purple and blue. It took a lot of patience and time to get the colours just right because they had to be similar contrasting colours. The best way is to pop down the paint shop and snap up colour swatches, that way you will get the colours just right.
Again, I was time poor, so I used the Giant Cupcake Tin along with 4 tart tins and baked them all at the same time.
Now because I was so excited to start assembling the cake, I completely forgot to take any photos along the way, so the photo below is of the cake almost half done. Sorry! But don't worry, the video tutorial really is very instructive, I will definitely be using their instructions again in the future.

The leftover bits you see in this photo I used later and shoved into ice-cream cones and topped off with the leftover icing as well. Now they looked really cute.
Now I spent some time doing the top of the cake. I put what I know now called as a crumb layer of buttercream icing. It’s called that because when you try to spread icing over your cake sometimes crumbs come to the surface. What you do is you pop your cake into the fridge overnight to set and the next day put another layer over that, and you then have a clean un-crumbed layer of icing on your cake. Nice idea! Wish I knew this in the past. Would have helped me out on so many occasions.
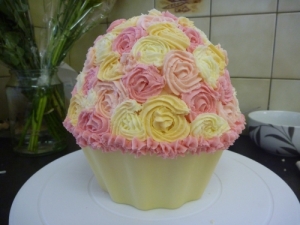
Once I had the top smoothed and rounded, I researched what I wanted to do for the top. I found a picture of a cake covered in vintage rose swirls. My oh my, that was exactly what I was looking for. So easy, and so effective. Perfectly fitting for my little princess, and because I love roses so much I was set on doing that for my cake.
I used four colours, light pink, light-light pink, ivory and un-coloured. By un-coloured I mean I didn't colour the icing, I left it a beautiful very light buttery colour, which matched the other colours beautifully. I then started randomly placing roses all over the top of the cake. Don't worry too much if they are not the same size all over, I found I had to place really small roses in-between others. That’s just how it worked out. If you need to practice, do it on your cutting board so you get an idea how the icing comes out of the piping tool. Also to make sure you like the tool you're using and to make sure the tool is the correct size for the project.


I used the light pink frosting to go around the middle of the cake to finish it off. It was really starting to look amazing, I was so proud of my little creation.

And there we have it, my Giant Cupcake Rainbow Cake.
Here are some photos of us on the day of my Daughters 1st Birthday. The decorations in the back will be part of a future tutorial, Giant Tissue Paper Rainbow Flowers, and everybody’s favorite paper chains, which are totally easy, I don’t even think I’ll bore you with those details.


And finally here are the links to the very instructional tutorials I used.
Giant Cupcake Rainbow Layer Cake
It took a while to create this post, this was from her birthday last year! I'm considering doing something similar for my brothers birthday... will tell you more about that later xx Candice
Leave a comment