How to Layer & Appliqué Wool Felt Like a Pro
If you’ve ever swooned over intricate wool felt appliqué designs and thought, how on earth do they get those layers so perfect?!, you’re in the right place. Whether you’re crafting a floral masterpiece, a whimsical animal scene, or something straight from your imagination, layering wool felt is the secret to adding depth, color, and personality to your work.
So, grab a cuppa, your wool felt stash, and let’s dive into the magic of appliqué!
Why Wool Felt is Perfect for Appliqué
Wool felt is hands-down the best fabric for appliqué. Why? Because it doesn’t fray! That means you can cut and layer shapes with crisp, clean edges without worrying about unraveling or messy seams. Plus, its natural thickness gives your designs that gorgeous, dimensional look.
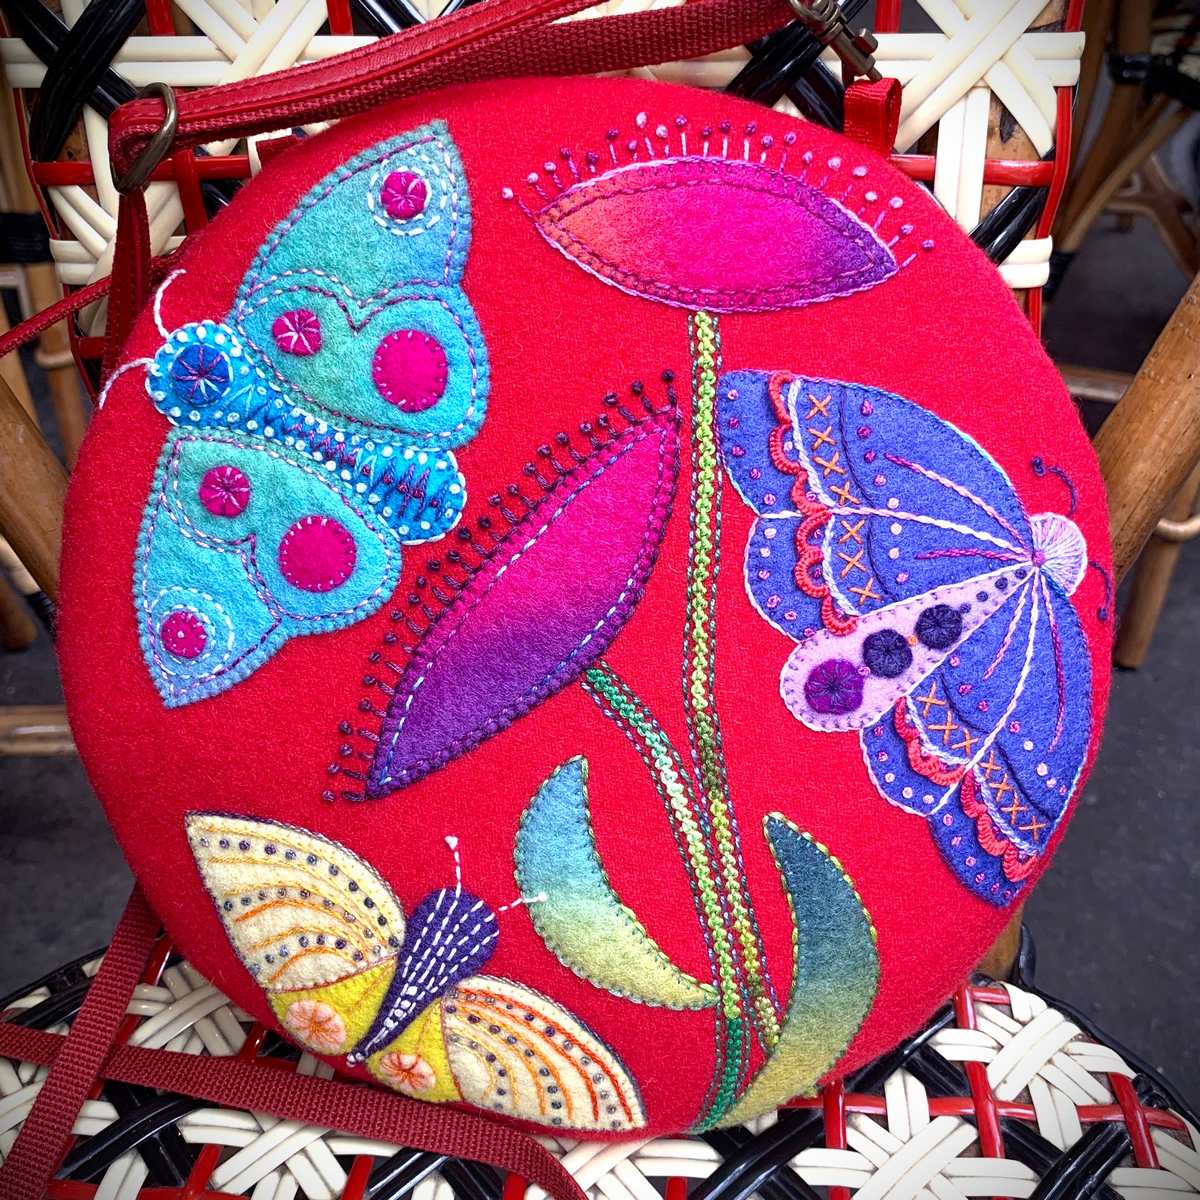
One designer who takes appliqué to the next level is the incredible Wendy Williams. If you haven’t seen her work yet, prepare to be blown away! Her detailed, layered wool felt appliqué pieces are rich with texture and color, showing just how stunning this technique can be.
Tools & Materials You Need
To get those professional-looking layers, you’ll need the right tools. Here’s what I use:
-
Wool Felt Sheets (100% wool felt is best for durability and vibrant colors)
-
Sharp Scissors (I swear by my Kai 5" sewing scissors for clean cuts)
-
Embroidery Needles (No.7 DMC embroidery needle is perfect for hand sewing)
-
DMC Embroidery Threads (Choose colors that complement your design)
-
Fabric Glue or Basting Spray (For temporarily holding layers in place)
-
Disappearing Ink Pen or Chalk (To mark placement without leaving permanent lines)
Step-by-Step Guide to Layering & Appliqué
Step 1: Choose & Cut Your Pieces
Pick a design that lends itself well to layering—floral patterns, birds, and whimsical landscapes all work beautifully. You can draw your own design or use a pattern (Wendy Williams’ appliqué projects are a fantastic place to start!).
Once you have your template, trace each layer onto the appropriate wool felt colors and cut them out using sharp scissors. Keep each shape as precise as possible—smooth edges will make all the difference.
Step 2: Arrange & Plan Your Layers
Before you start stitching, lay out your pieces on your background fabric to see how they fit together. This is your chance to play around with placement and adjust anything that doesn’t feel quite right.
Pro Tip: Take a quick photo of your arrangement before you start sewing—this will help you remember the exact placement of each layer!
Step 3: Secure the Layers
If you’re working with lots of small pieces, a tiny dab of fabric glue or a light spritz of basting spray can help keep everything in place while you sew. Just be careful not to use too much—wool felt is absorbent, and you don’t want it getting stiff.
Step 4: Stitch It Down
Time to bring out your embroidery needle and thread! Choose a stitch that works best for your design:
-
Whip Stitch – Great for securing edges invisibly.
-
Blanket Stitch – Adds a decorative border while securing layers.
-
Running Stitch – Perfect for creating a more relaxed, folk-art look.
-
French Knots & Lazy Daisies – Beautiful embellishments for flowers or details.
Pro Tip: Use 2-3 strands of DMC thread for a delicate look, or all 6 strands for bold, chunky stitches that make your appliqué pop!
Step 5: Add Extra Dimension
For extra depth, consider slightly stuffing certain pieces before sewing them down—this works beautifully for creating raised petals, puffy clouds, or dimensional animal features. Simply add a tiny bit of wool roving or batting under a felt layer before stitching it down.
Projects to Try
Feeling inspired? Here are some gorgeous wool felt appliqué projects to get you started:
Woolly Pincushions – Gorgeous designs of simple applilque to really get you into the world of Applique.

Birds of Play Handbag – Make your friends super jealous with your new skills and your fun new handbag.

Baby Blooms Quilt – Level up with the best design that will be your shining finished project of your crafting life!

Final Tips for Flawless Appliqué
✔ Start Simple – If you're new to layering wool felt, begin with a 2-3 layer design before moving on to intricate projects. ✔ Keep Scissors Sharp – The cleaner the cut, the better your appliqué will look! ✔ Mix Textures – Try layering patterned wool felt or using a mix of embroidery stitches to add interest. ✔ Don’t Rush! – Enjoy the process—every stitch is part of the story you're creating.
So, lovely, are you ready to dive into the world of wool felt appliqué? Whether you’re making something for yourself, a gift for someone special, or just want to experiment, I promise you’ll fall in love with the process.
Tell me, what’s the first appliqué project you’re planning to try? I’d love to hear!
Yours Feltfully,
Candice
Comments
Leave a comment